
We reviewed different trainer set ups and found that in most cases due to the position of the front wheel and handlebars. Reach was compromised. Dedicate trainer desks were often more expensive, so we decided to trial building our own for as cheaply as possible to create a station and customise it to our needs and preferences.
Our desk design goals were
1. Eye level viewing, so avoid craning our necks
2. Ability to reach devices whilst pedalling, often station is restricted bars/front wheel
3. Head on fan placement
4. Somewhere to put a towel and waterbottle, so we don't have to break pedalling and reach for a bottle
Materials
2 x 2400mm wooden planed timber (£3.47 ea)
8 x London shelf brackets — the smaller the better (£3.99 pack of 20)
24 x wood screws — self tapping if available (£4.39 pack of 20)
1x MDF / Plywood 800mm x 400mm, 12mm thick (£12.47)
1x brass plated cup hook with thread (£1.12)
2x Wood Shelf Brackets, optional (£6 ea)
The prices were valid when building in January 2024.
Notes: We used smooth planed studwork wood, 63mm (width) x 38mm (thick), available in 2.4m lengths (£3.47). You can use thinner and narrow timber as this will be lighter, but the structure you build may need an additional brace.
The MDF we purchased (£12.47) was available in a smaller size and we didn't need to cut it. We found that the desk should have a depth of 400mm; any shallower and it became a squeeze to fit our fan, bottle and laptop on.

Tools
Drill (electric or hand)
Screwdriver
Bradawl (you can also use thumb tacks, a compass or tweezers)
Saw (or use B&Q's free wood cutting service)
Pencil
Notes: We use B&Q's free wood cutting service. They allow you to make five cuts per piece of wood purchased. We asked them to make four cuts in our timber.
You can also ask them to cut your sheet of MDF to a custom size.
Any additional cuts are 50p.

When we built our first draft unit, we used L-shaped metal brackets. However, these flexed and made the desk wobble and therefore we're joining our structure together with London shelf brackets, which can take a weight of up to 10kg per bracket.
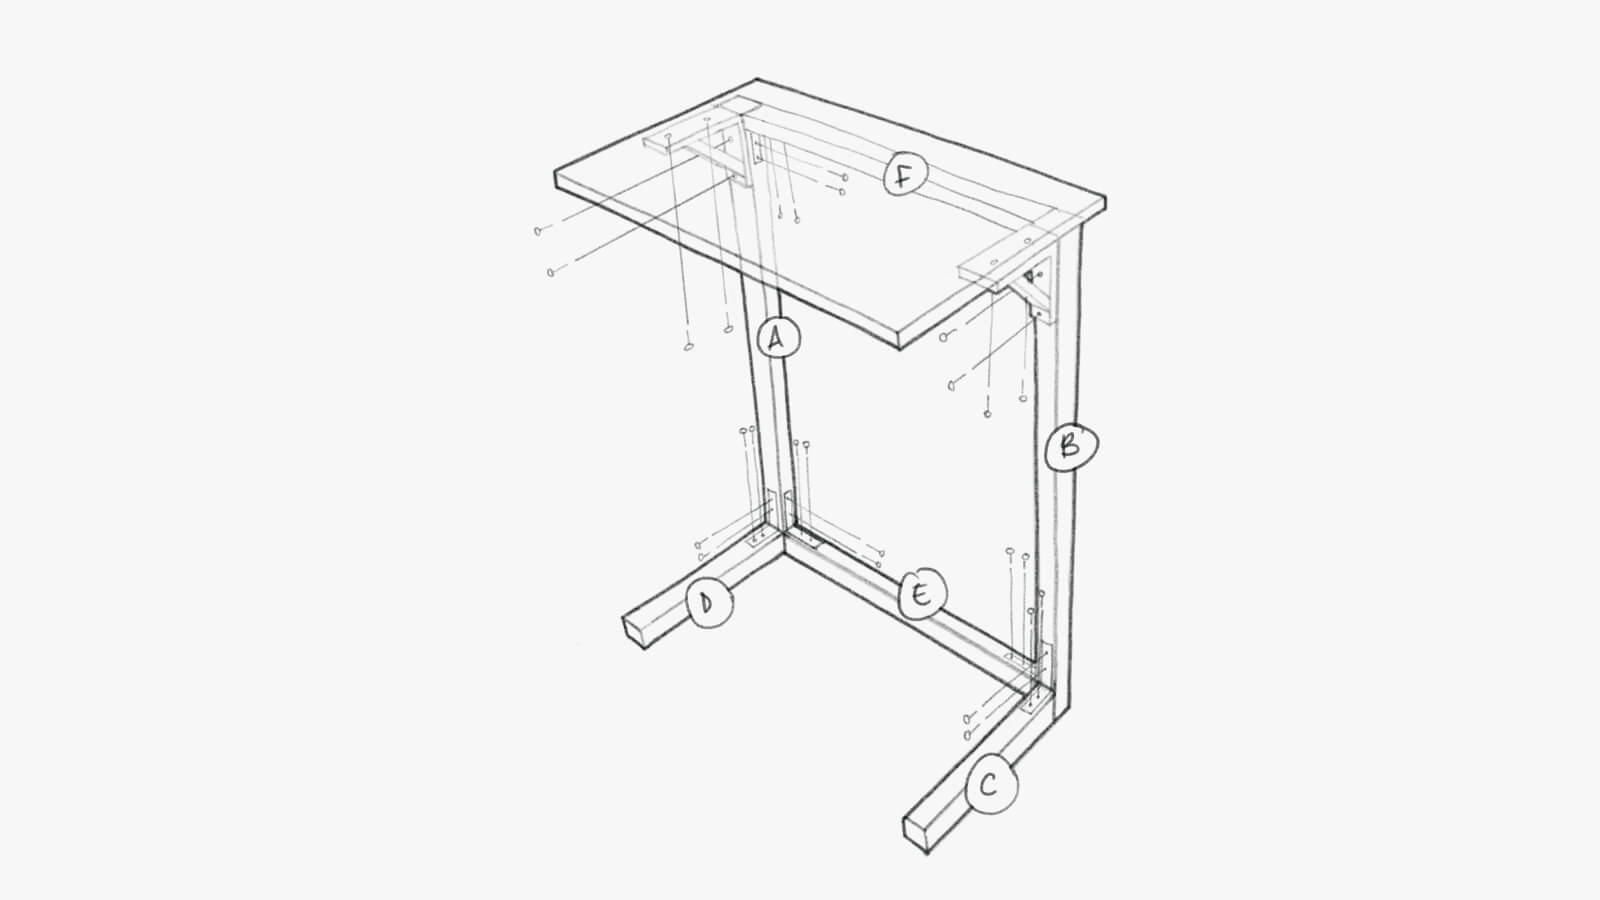
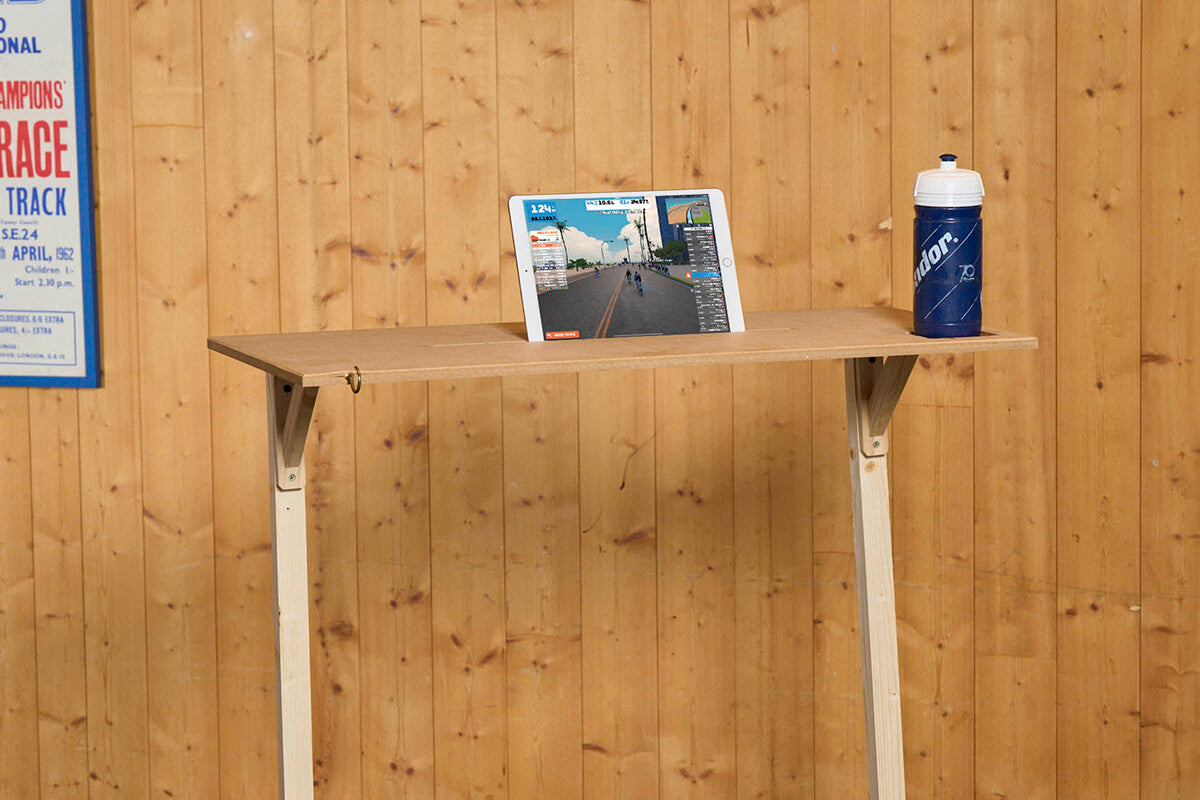
We also added in wood brackets to hold the shelf for a neater look. Our dimensions mirror the Wahoo Kickr Desk and would suit riders who like to watch devices at eye level or riders who use medium to extra large frames.
If you are a rider using an extra small to small frame, you may wish to reduce the height of the desk to 100cm.
Step 1.
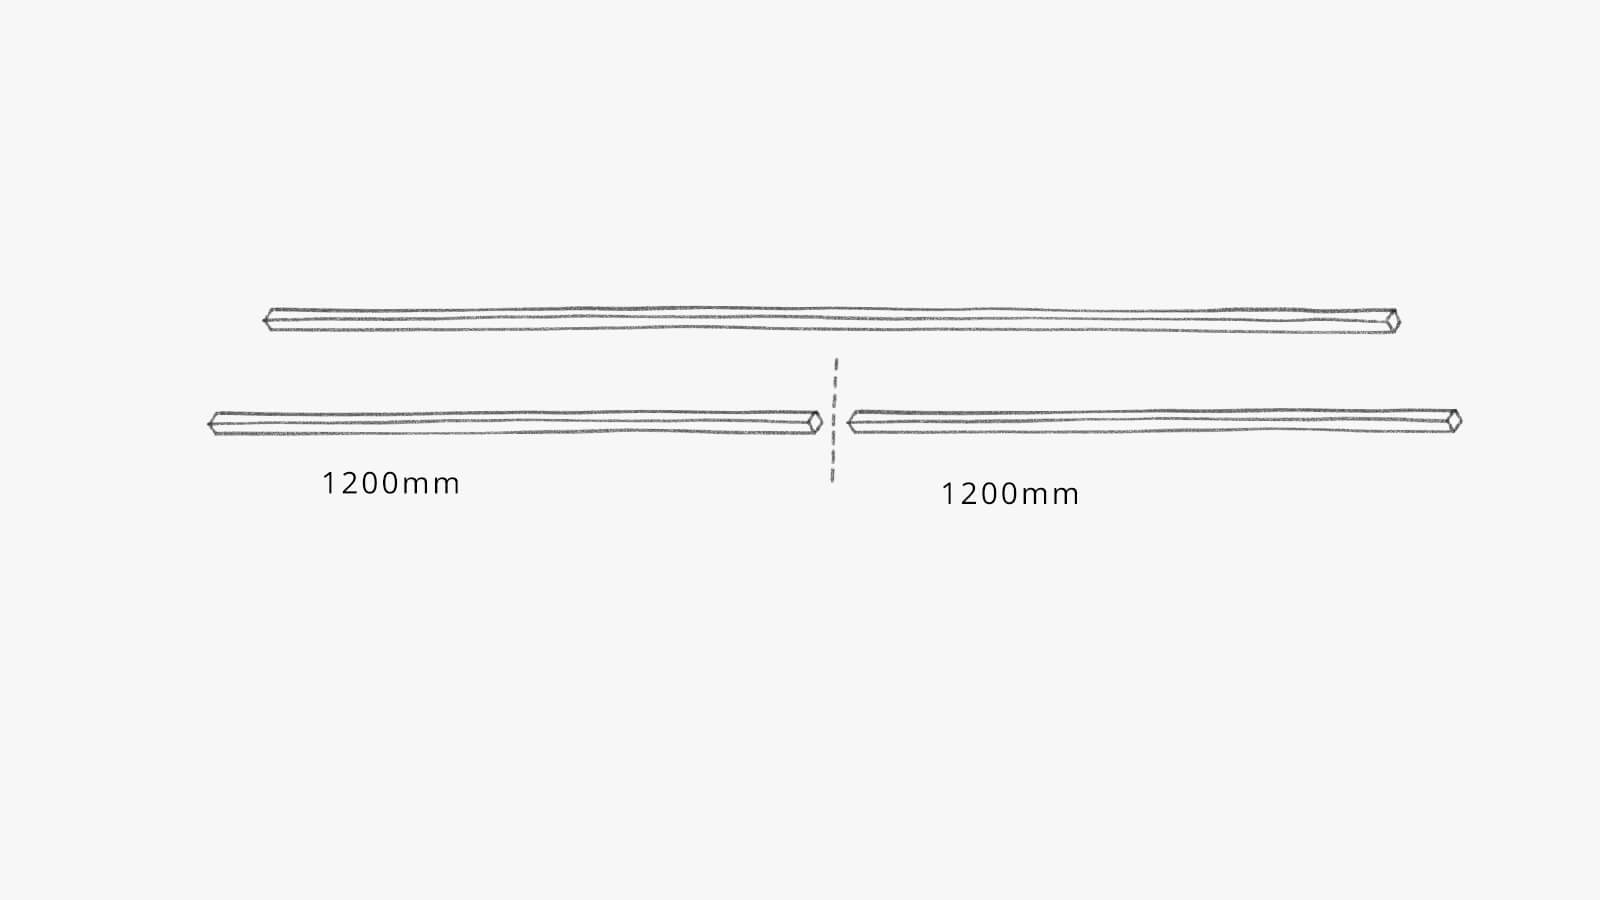
Cut the first piece of timber (2400mm) in half to create two 1200mm pieces. These are your uprights, annotated on the sketch as A and B.
Step 2.
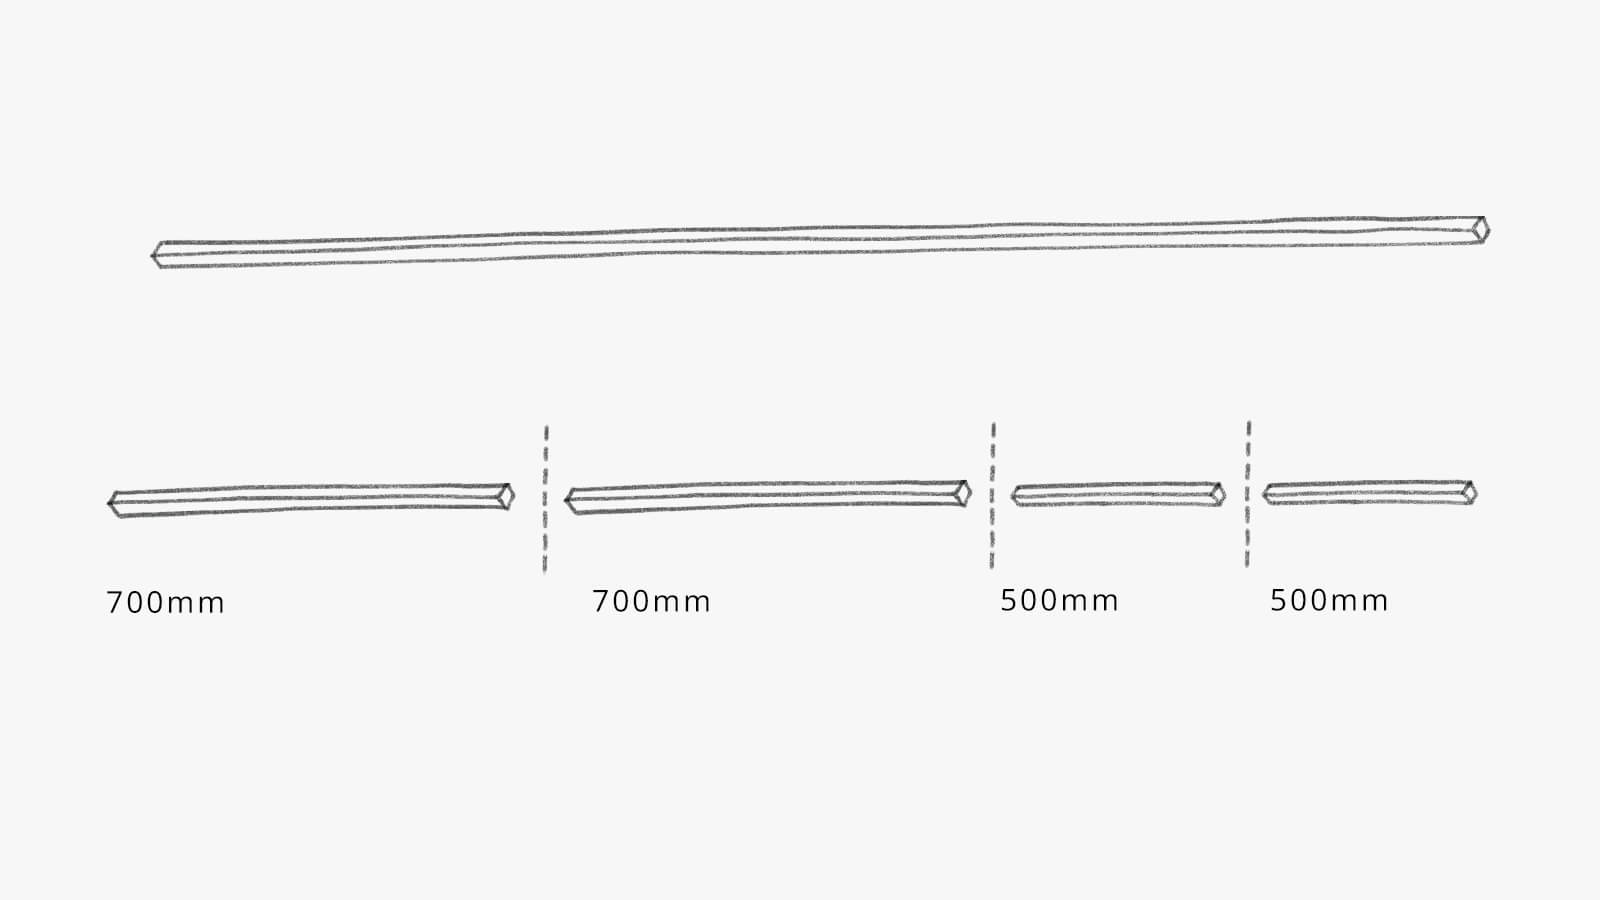
For the base, use the second piece of timber. Measure 2 x 500mm lengths and 2 x 700mm lengths. The 500mm length are your base. The 700mm lengths can be made shorter if you have a narrower desk. These are annotated on the sketch as C, D and E
The final 700mm piece is not required but could be used as a brace (shown as F on the sketch).
Step 3.
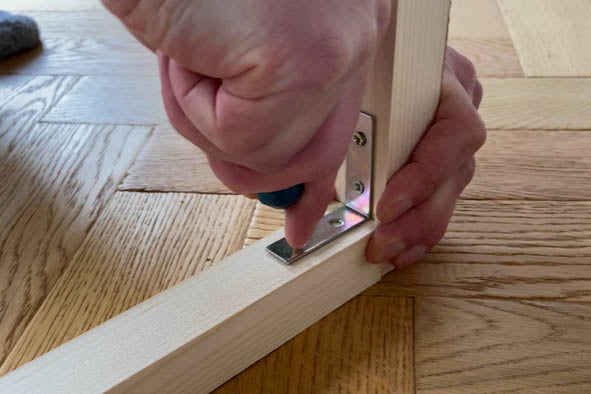
Hold the 500mm base piece (D) next to your 1200mm upright (A) to create an L shape. Get your metal shelf bracket and mark the screw holes with a pencil. Using a bradawl dig into the wood where you marked the pencil screw holes.
Step 4.
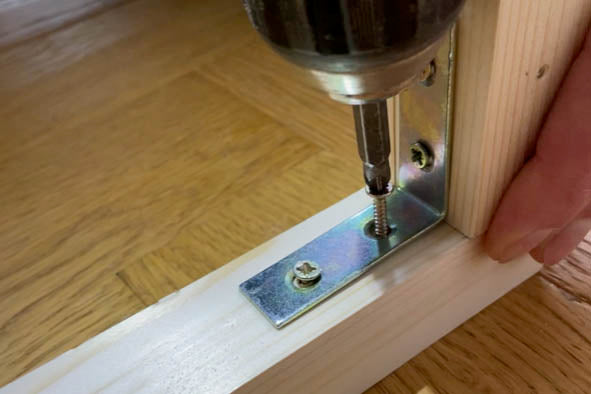
Using a screwdriver or drill screw the bracket into the 500mm piece of wood and then fit the 1200mm piece of timber to the other side of the bracket.
Step 5.
Repeat for process with the other pieces of wood (B and C) to create another L shape.
Step 6.

Take one of the L shapes and line up your 700mm piece (annotated E on the drawing), along with the right side of your L. Line up the brackets again and mark as before, then attach the timber to the L.
Step 7.
Join the other L to the 700m piece of timber. You should now have a free-standing structure that just needs the table top.
Step 8.

Balance your table top on the structure. Take your shelf bracket and line up the position of the screw holes. This will ensure you don't fit you brackets too high on your structure and misalign the top.
Step 9.
Fit both shelf brackets to the structure. Our desk shows shows a wooden bracket that we purchased from B&Q.
Step 10.
Align the top so it is centred. Mark the wood and fit the final screws to hold the top to your structure.
Step 11.
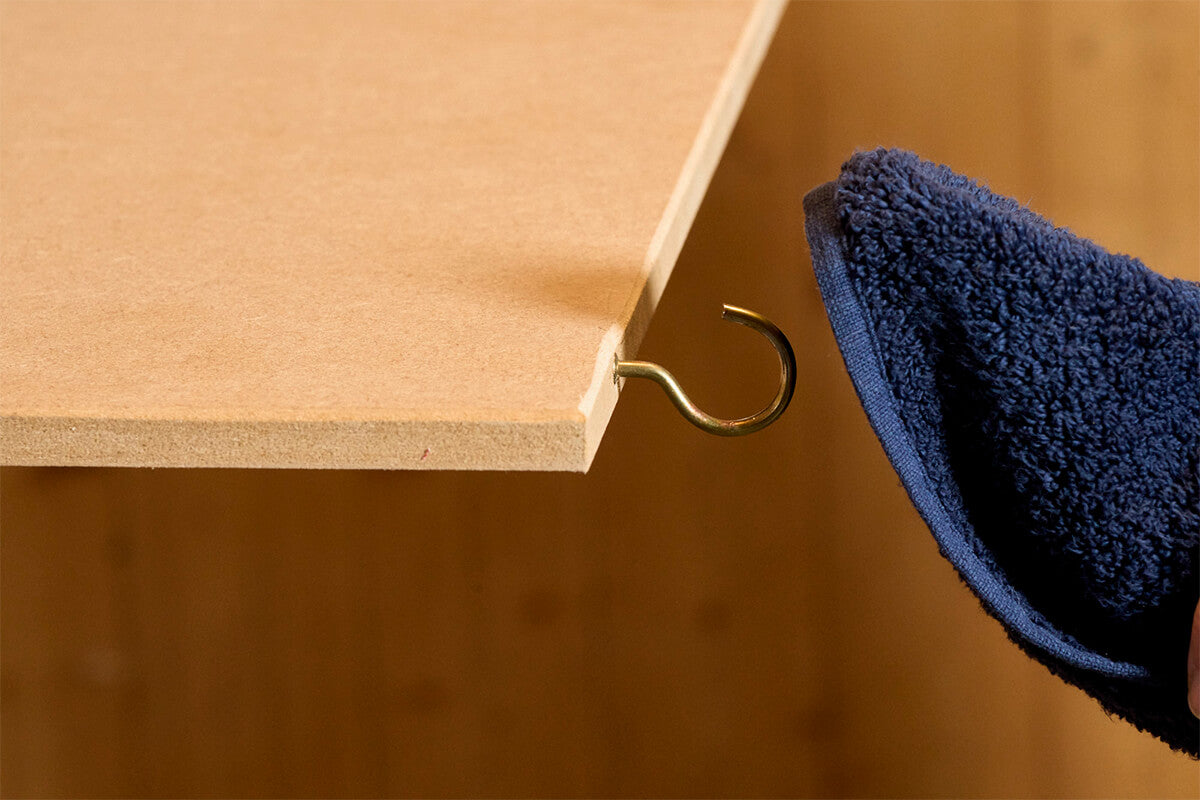
Fit the hook. Using the bradawl mark the wood, then hand screw in the brass hook for your towel. You can also use a stick on plastic hook and mount this to the table top.

Extra personalisation and our notes
You could have a narrower piece of wood/offcut, 50cm. You could even screw a large plastic tray to the unit.
We used a router (or you can use a chisel) to cut a slot to hold a tablet, a phone and a water bottle.
We drilled holes to slot iPhone and power cables through the desk top.
You can also use an old yoghurt tub as a water bottle holder.
Screw in a hook on the front to hold a towel.
Fit castor legs to make it easy to pull closer or further away.
You can make a narrower desk top should you want to use less space.
Paint to match your space.